My blog has moved!

You will be automatically redirected to the new address. If that does not occur, visit
http://utku-utkan.appspot.com/
and update your bookmarks.

Pages

Thursday, July 26, 2007

Dynamic Forms in Wicket

The Dynamic Form Application is an example Wicket application to demonstrate forms with varying number of input fields. This application has only one page which contains the form having varying number of input fields to enter the words, and another input field to display the sentence composed from the entered words. The number of the fields is determined randomly at page refresh. When the user submits the form the sentence composed from the words is displayed.


In this example, you have to put all files in the same package directory. This means putting the markup files and the java files next to one another. It is possible to alter this behavior, but that is beyond the scope of this example.

Word.java
Word is a just a serializable POJO defining the properties that are associated with UI components used on the page. In our simple example, Word has only one property named text.

package com.hoydaa.dynamicform;

import java.io.Serializable;

public class Word implements Serializable {

    private static final long serialVersionUID = 1L;

    private String text;

    public Word(String text) {
        this.text = text;
    }

    public String getText() {
        return text;
    }

    public void setText(String text) {
        this.text = text;
    }
}


DynamicFormPage.java
DynamicFormPage is a class of type WebPage, which is also the homepage of the application. In this class, Wicket components are added to the page just like the Swing components are being added to a Swing frame.

Inside the constructor of DynamicFormPage, DynamicForm - which is a Form component - is added to the page with the ID of "form".

Inside the constructor of the DynamicForm, a TextArea component with the ID of "sentence" is added to the form in order to store the sentence composed from the words. This component is bounded to the sentence attribute of the DynamicForm via PropertyModel.

Since there will be several words; there must be a list to store these words. Initially this list is created with random number of empty Words. Later on, a ListView component is added to form. Well, all the magic is here. ListView calls the populateItem method for each of the words. As a result, a TextField component is added to the form for each of the Words inside the words list.

Finally, onSubmit method of the Form class is overridden in order to set the sentence to the composition of the words.

package com.hoydaa.dynamicform;

import java.util.ArrayList;
import java.util.List;
import java.util.Random;

import wicket.PageParameters;
import wicket.markup.html.WebPage;
import wicket.markup.html.form.Form;
import wicket.markup.html.form.TextArea;
import wicket.markup.html.form.TextField;
import wicket.markup.html.list.ListItem;
import wicket.markup.html.list.ListView;
import wicket.model.PropertyModel;

public class DynamicFormPage extends WebPage {

    private static final long serialVersionUID = 1L;

    public DynamicFormPage(PageParameters params) {
        add(new DynamicForm("form"));
    }

    public class DynamicForm extends Form {

        private static final long serialVersionUID = 1L;

        private String sentence;
        private List words;

        public DynamicForm(String id) {
            super(id);

            TextArea textArea = new TextArea("sentence", new PropertyModel(this, "sentence"));
            textArea.setOutputMarkupId(true);
            add(textArea);

            Random random = new Random();
            int numberOfFields = random.nextInt(4) + 1;

            words = new ArrayList();

            for (int i = 0; i < numberOfFields; i++) {
                words.add(new Word(""));
            }

            add(new ListView("list", words) {

                private static final long serialVersionUID = 1L;

                @Override
                protected void populateItem(ListItem item) {
                    final Word word = (Word) item.getModelObject();

                    TextField textField = new TextField("word", new PropertyModel(word, "text"));
                    textField.setOutputMarkupId(true);
                    item.add(textField);
                }
            });
        }

        public String getSentence() {
            return sentence;
        }

        public void setSentence(String sentence) {
            this.sentence = sentence;
        }

        @Override
        protected void onSubmit() {
            StringBuffer strBuff = new StringBuffer();

            for (Word word : words) {
                strBuff.append(word.getText());
                strBuff.append(" ");
            }

            sentence = strBuff.toString();
        }
    }
}


DynamicFormPage.html
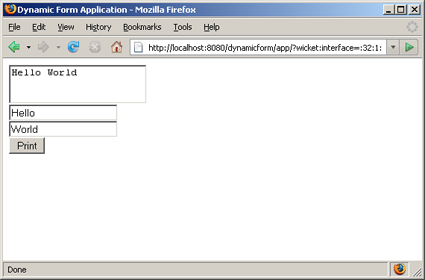
This html is the markup file for the DynamicFormPage class. In this html, there is a matching html element for every component added to the DynamicFromPage. Inside the body tag there is the form element for the corresponding form component. The first input element of this form is the sentence text area, which is to display the sentence composed from the values entered to the word text inputs. Right after the sentence text area, there is a div element that will be iterated with its content. The content of this iteration element is just a text input to fetch the words from the user. And the last element is the submit button.

<!DOCTYPE html PUBLIC "-//W3C//DTD XHTML 1.0 Transitional//EN"
    "http://www.w3.org/TR/xhtml1/DTD/xhtml1-transitional.dtd">

<html xmlns="http://www.w3.org/1999/xhtml"
    xmlns:wicket="http://wicket.sourceforge.net">
    <head>
        <title>Dynamic Form Application</title>
    </head>
    <body>
        <form wicket:id="form">
            <textarea wicket:id="sentence"></textarea>
            <div wicket:id="list">
                <input wicket:id="word" type="text"/>
            </div>
            <input type="submit" value="Print"/>
        </form>
    </body>
</html>


DynamicFormApp.java
In Wicket, there must be an application class to declare application wide settings such as the homepage of the application. In this example, getHomePage method of the WebApplication base class is overridden to return DynamicFormPage.class as the homepage.

package com.hoydaa.dynamicform;

import wicket.protocol.http.WebApplication;

public class DynamicFormApp extends WebApplication {

    @Override
    public Class getHomePage() {
        return DynamicFormPage.class;
    }
}


web.xml
Any Wicket Web application requires a Servlet definition to initialize the framework. The name of the application class that is presented above must be declared as an initialization parameter to this Servlet definition.

<?xml version="1.0" encoding="UTF-8"?>

<web-app id="WebApp_ID" version="2.4"
    xmlns="http://java.sun.com/xml/ns/j2ee"
    xmlns:xsi="http://www.w3.org/2001/XMLSchema-instance"
    xsi:schemaLocation="http://java.sun.com/xml/ns/j2ee http://java.sun.com/xml/ns/j2ee/web-app_2_4.xsd">

    <display-name>dynamicform</display-name>

    <servlet>
        <servlet-name>DynamicFormApplication</servlet-name>
        <servlet-class>wicket.protocol.http.WicketServlet</servlet-class>
        <init-param>
            <param-name>applicationClassName</param-name>
            <param-value>com.hoydaa.dynamicform.DynamicFormApp</param-value>
        </init-param>
        <load-on-startup>1</load-on-startup>
    </servlet>

    <servlet-mapping>
        <servlet-name>DynamicFormApplication</servlet-name>
        <url-pattern>/app/*</url-pattern>
    </servlet-mapping>
</web-app>

Starting a Web Application Project with Maven

In this article I will not tell what Maven is, and why we need it. Instead, I will explain how to start a Web application project with Maven in a step-by-step manner. If you still have doubts on using Maven, I suggest you to read "What is Maven?" post at Maven web site, and visit this page again when you decide on using Maven for your new Web application.

We will use Maven's archetype mechanism to create our project. Before executing the required command, go to the directory that you want to create your project. This directory can be different from the workspace of Eclipse. I have chosen this directory as "D:\Projects". Now, execute the following inside the directory you have chosen:

D:\Projects>mvn archetype:create -DgroupId=com.mycompany.maven-webapp -DartifactId=maven-webapp -DarchetypeArtifactId=maven-archetype-webapp


After the archetype generation has completed, you will notice that the following directory structure has been created.

D:\Projects
    maven-webapp
        src
            main
                resources
                webapp
                    WEB-INF
                        web.xml
                    index.jsp
        pom.xml


As you see there is no source folder for Java files. We will add this source folder manually by just creating a folder named "java" under "D:\Projects\maven-webapp\src\main". After this step the new directory layout will be as follows.

D:\Projects
    maven-webapp
        src
        java
            main
                resources
                webapp
                    WEB-INF
                        web.xml
                    index.jsp
        pom.xml


You must have noticed the "pom.xml" file in the project's root folder. If you are using Maven, you should be familiar with this file, and at least learn the basics of it. Initial content of this file is displayed below.

<project xmlns="http://maven.apache.org/POM/4.0.0" xmlns:xsi="http://www.w3.org/2001/XMLSchema-instance" xsi:schemaLocation="http://maven.apache.org/POM/4.0.0 http://maven.apache.org/maven-v4_0_0.xsd">
    <modelVersion>4.0.0</modelVersion>
    <groupId>com.mycompany.maven-webapp</groupId>
    <artifactId>maven-webapp</artifactId>
    <packaging>war</packaging>
    <version>1.0-SNAPSHOT</version>
    <name>maven-webapp Maven Webapp</name>
    <url>http://maven.apache.org</url>
    <dependencies>
        <dependency>
            <groupId>junit</groupId>
            <artifactId>junit</artifactId>
            <version>3.8.1</version>
            <scope>test</scope>
        </dependency>
    </dependencies>
    <build>
        <finalName>maven-webapp</finalName>
    </build>
</project>


If your Compliance Level is set to 5.0 or 6.0 at Eclipse, a slight modification needs to be done on this file. You can check your compliance level from "Window > Preferences > Java > Compiler". Mine is set to 6.0, as it is seen below.


Now, we will modify "pom.xml" to set the compliance level to 6.0. In order to do that, we will overwrite the default configuration parameters of "maven-compiler-plugin". Otherwise, an error will appear in the Problems panel of Eclipse with the description: "Java compiler level does not match the version of the installed Java project facet". After this modification, the content of "pom.xml" will be as follows.

<project xmlns="http://maven.apache.org/POM/4.0.0" xmlns:xsi="http://www.w3.org/2001/XMLSchema-instance" xsi:schemaLocation="http://maven.apache.org/POM/4.0.0 http://maven.apache.org/maven-v4_0_0.xsd">
    <modelVersion>4.0.0</modelVersion>
    <groupId>com.mycompany.maven-webapp</groupId>
    <artifactId>maven-webapp</artifactId>
    <packaging>war</packaging>
    <version>1.0-SNAPSHOT</version>
    <name>maven-webapp Maven Webapp</name>
    <url>http://maven.apache.org</url>
    <dependencies>
        <dependency>
            <groupId>junit</groupId>
            <artifactId>junit</artifactId>
            <version>3.8.1</version>
            <scope>test</scope>
        </dependency>
    </dependencies>
    <build>
        <finalName>maven-webapp</finalName>
        <plugins>
            <plugin>
                <groupId>org.apache.maven.plugins</groupId>
                <artifactId>maven-compiler-plugin</artifactId>
                <configuration>
                    <source>1.6</source>
                    <target>1.6</target>
                </configuration>
            </plugin>
        </plugins>

    </build>
</project>


If you have noticed, current directory structure of the project is slightly different than the directory structure of a Web application project created with Eclipse. In fact, there is no ".project", or ".classpath" files which are mandatory for an Eclipse project. So how are we going to import this project into Eclipse? Well, the answer is the "eclipse" plug-in (There is also a plug-in for IDEA).

Now, go to the project and execute the following command to generate Eclipse specific files for the project.

D:\Projects\maven-webapp>mvn eclipse:eclipse -Dwtpversion=1.5


After the execution of this command, the new directory structure will be as follows:

D:\Projects
    maven-webapp
        .settings
            org.eclipse.wst.common.component
            org.eclipse.wst.common.project.facet.core.xml

        src
            main
                java
                resources
                webapp
                    WEB-INF
                        web.xml
                    index.jsp
        target
            classes
            mvn-eclipse-cache.properties
        .classpath
        .project

        pom.xml


In Maven, all the dependencies are stored in a local repository – which is normally under "C:\Documents and Settings\your_account_name\.m2" – and referenced with the classpath variable "M2_REPO" which must point to this local repository. If you haven't added this classpath variable to Eclipse yet, you can do it by executing the following command. ("eclipse.workspace" parameter should be the location of the Eclipse workspace. Mine is "D:\Workspaces\Lab".)

D:\Projects\maven-webapp>mvn eclipse:add-maven-repo -Declipse.workspace=D:\Workspaces\Lab


We are almost done. Now, to import the project into Eclipse select "File->Import->Existing Projects into Workspace".


Click "Next >" to get the "Import Projects" dialog box.


Select the radio button with the label "Select root directory". Then, click on the "Browse" button and navigate to the folder that you have created. Mine is "D:\Projects\maven-webapp". Finally, click on the "Finish" button.

Well, that's it! You have a brand new Web application created with Maven. For those who are saying "Thank you!" I reply "Not a big deal".

Struts File Validator

Struts Validator Framework provides the functionality to validate form data. It can be used to validate data on the user's browser as well as on the server side, and it ships with pre-defined validators, such as: required, requiredif, validwhen, minlength, maxlength, mask, byte, short, integer, long, float, double, date, range, intRange, floatRange, doubleRange, creditCard, email, url. Now, we will develop four more validators to validate file fields which are requiredFile, minFileSize, maxFileSize and fileContent.

Struts File Validator which is an extension for Struts Validaor Framework is composed of two utility classes FormFileValidator and FileFieldCheks. FormFileValidator is independent from Struts and it provides the actual validation methods. On the other hand, FileFieldChecks uses these validation methods to supply the validation routines for the Struts Framework.

The Validator framework is set up as a pluggable system of validation routines that can be applied to Form Beans. In order to use File Validation routines in your Struts application, they must be loaded first through validator-rules.xml file. Configuration elements for requiredFile, minFileSize, maxFileSize and fileContent validators are as follows:

<validator name="requiredFile"
   classname="com.coresun.commons.struts.validator.FileFieldChecks"
   method="validateRequiredFile"
   methodParams="java.lang.Object,
      org.apache.commons.validator.ValidatorAction,
      org.apache.commons.validator.Field,
      org.apache.struts.action.ActionMessages,
      org.apache.commons.validator.Validator,
      javax.servlet.http.HttpServletRequest"
   msg="errors.requiredfile"/>


<validator name="minFileSize"
   classname="com.coresun.commons.struts.validator.FileFieldChecks"
   method="validateMinFileSize"
   methodParams="java.lang.Object,
      org.apache.commons.validator.ValidatorAction,
      org.apache.commons.validator.Field,
      org.apache.struts.action.ActionMessages,
      org.apache.commons.validator.Validator,
      javax.servlet.http.HttpServletRequest"
   msg="errors.minfilesize"/>


<validator name="maxFileSize"
   classname="com.coresun.commons.struts.validator.FileFieldChecks"
   method="validateMaxFileSize"
   methodParams="java.lang.Object,
      org.apache.commons.validator.ValidatorAction,
      org.apache.commons.validator.Field,
      org.apache.struts.action.ActionMessages,
      org.apache.commons.validator.Validator,
      javax.servlet.http.HttpServletRequest"
   msg="errors.maxfilesize"/>


<validator name="fileContent"
   classname="com.coresun.commons.struts.validator.FileFieldChecks"
   method="validateFileContent"
   methodParams="java.lang.Object,
      org.apache.commons.validator.ValidatorAction,
      org.apache.commons.validator.Field,
      org.apache.struts.action.ActionMessages,
      org.apache.commons.validator.Validator,
      javax.servlet.http.HttpServletRequest"
   msg="errors.filecontent"/>


Once these configuration elements are added to the validatitor-rules.xml, you are ready validate file fields of the Form Beans. The following describes the validation routines supplied by Struts File Validator extension.
  • requiredFile: Mandatory file field validation. Has no variables.

<field property="picture" depends="requiredFile">
   <arg0 key="customer.picture"/>
</field>

  • minFileSize: Validate size of the file isn't less than a specified minimum size. Requires a minFileSize variable and a unit variable. unit variable should be KB, MB or GB.

<field property="picture" depends="requiredFile,minFileSize">
   <arg0 key="customer.picture"/>
   <arg1 key="${var:min}" resource="false"/>
   <arg2 key="${var:unit}" resource="false"/>
   <var>
      <var-name>min</var-name>
      <var-value>10</var-value>
   </var>
   <var>
      <var-name>unit</var-name>
      <var-value>KB</var-value>
   </var>
</field>

  • maxFileSize: Validate size of the file doesn't exceed a specified maximum size. Requires a maxFileSize variable and a unit variable. unit variable should be KB, MB or GB.

<field property="picture" depends="requiredFile,maxFileSize">
   <arg0 key="customer.picture"/>
   <arg1 key="${var:max}" resource="false"/>
   <var>
      <var-name>max</var-name>
      <var-value>1</var-value>
   </var>
   <var>
      <var-name>unit</var-name>
      <var-value>MB</var-value>
   </var>
</field>

  • fileContent: Validate content type of the file. Requires a fileContents variable that is composed of comma separated list of the valid content types.

<field property="picture" depends="requiredFile,fileContent">
   <arg0 key="customer.picture"/>
   <var>
      <var-name>contentTypes</var-name>
      <var-value>image/jpeg</var-value>
   </var>
</field>


And finally, error messages for these validators should be added to the MessageResources.properties file.

errors.requiredfile={0} is required.
errors.minfilesize={0} can not be less than {1} {2}.
errors.maxfilesize={0} can not be greater than {1} {2}.
errors.filecontent={0} is not a valid file.


You can either download the binary or the source distribution of Struts File Validator extension.