We will use Maven's archetype mechanism to create our project. Before executing the required command, go to the directory that you want to create your project. This directory can be different from the workspace of Eclipse. I have chosen this directory as "D:\Projects". Now, execute the following inside the directory you have chosen:
D:\Projects>mvn archetype:create -DgroupId=com.mycompany.maven-webapp -DartifactId=maven-webapp -DarchetypeArtifactId=maven-archetype-webapp
After the archetype generation has completed, you will notice that the following directory structure has been created.
D:\Projects
maven-webapp
src
main
resources
webapp
WEB-INF
web.xml
index.jsp
pom.xml
maven-webapp
src
main
resources
webapp
WEB-INF
web.xml
index.jsp
pom.xml
As you see there is no source folder for Java files. We will add this source folder manually by just creating a folder named "java" under "D:\Projects\maven-webapp\src\main". After this step the new directory layout will be as follows.
D:\Projects
maven-webapp
src
java
main
resources
webapp
WEB-INF
web.xml
index.jsp
pom.xml
maven-webapp
src
java
main
resources
webapp
WEB-INF
web.xml
index.jsp
pom.xml
You must have noticed the "pom.xml" file in the project's root folder. If you are using Maven, you should be familiar with this file, and at least learn the basics of it. Initial content of this file is displayed below.
<project xmlns="http://maven.apache.org/POM/4.0.0" xmlns:xsi="http://www.w3.org/2001/XMLSchema-instance" xsi:schemaLocation="http://maven.apache.org/POM/4.0.0 http://maven.apache.org/maven-v4_0_0.xsd">
<modelVersion>4.0.0</modelVersion>
<groupId>com.mycompany.maven-webapp</groupId>
<artifactId>maven-webapp</artifactId>
<packaging>war</packaging>
<version>1.0-SNAPSHOT</version>
<name>maven-webapp Maven Webapp</name>
<url>http://maven.apache.org</url>
<dependencies>
<dependency>
<groupId>junit</groupId>
<artifactId>junit</artifactId>
<version>3.8.1</version>
<scope>test</scope>
</dependency>
</dependencies>
<build>
<finalName>maven-webapp</finalName>
</build>
</project>
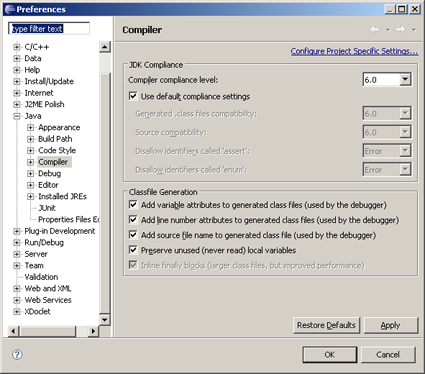
If your Compliance Level is set to 5.0 or 6.0 at Eclipse, a slight modification needs to be done on this file. You can check your compliance level from "Window > Preferences > Java > Compiler". Mine is set to 6.0, as it is seen below.
Now, we will modify "pom.xml" to set the compliance level to 6.0. In order to do that, we will overwrite the default configuration parameters of "maven-compiler-plugin". Otherwise, an error will appear in the Problems panel of Eclipse with the description: "Java compiler level does not match the version of the installed Java project facet". After this modification, the content of "pom.xml" will be as follows.
<project xmlns="http://maven.apache.org/POM/4.0.0" xmlns:xsi="http://www.w3.org/2001/XMLSchema-instance" xsi:schemaLocation="http://maven.apache.org/POM/4.0.0 http://maven.apache.org/maven-v4_0_0.xsd">
<modelVersion>4.0.0</modelVersion>
<groupId>com.mycompany.maven-webapp</groupId>
<artifactId>maven-webapp</artifactId>
<packaging>war</packaging>
<version>1.0-SNAPSHOT</version>
<name>maven-webapp Maven Webapp</name>
<url>http://maven.apache.org</url>
<dependencies>
<dependency>
<groupId>junit</groupId>
<artifactId>junit</artifactId>
<version>3.8.1</version>
<scope>test</scope>
</dependency>
</dependencies>
<build>
<finalName>maven-webapp</finalName>
<plugins>
<plugin>
<groupId>org.apache.maven.plugins</groupId>
<artifactId>maven-compiler-plugin</artifactId>
<configuration>
<source>1.6</source>
<target>1.6</target>
</configuration>
</plugin>
</plugins>
</build>
</project>
If you have noticed, current directory structure of the project is slightly different than the directory structure of a Web application project created with Eclipse. In fact, there is no ".project", or ".classpath" files which are mandatory for an Eclipse project. So how are we going to import this project into Eclipse? Well, the answer is the "eclipse" plug-in (There is also a plug-in for IDEA).
Now, go to the project and execute the following command to generate Eclipse specific files for the project.
D:\Projects\maven-webapp>mvn eclipse:eclipse -Dwtpversion=1.5
After the execution of this command, the new directory structure will be as follows:
D:\Projects
maven-webapp
.settings
org.eclipse.wst.common.component
org.eclipse.wst.common.project.facet.core.xml
src
main
java
resources
webapp
WEB-INF
web.xml
index.jsp
target
classes
mvn-eclipse-cache.properties
.classpath
.project
pom.xml
maven-webapp
.settings
org.eclipse.wst.common.component
org.eclipse.wst.common.project.facet.core.xml
src
main
java
resources
webapp
WEB-INF
web.xml
index.jsp
target
classes
mvn-eclipse-cache.properties
.classpath
.project
pom.xml
In Maven, all the dependencies are stored in a local repository – which is normally under "C:\Documents and Settings\your_account_name\.m2" – and referenced with the classpath variable "M2_REPO" which must point to this local repository. If you haven't added this classpath variable to Eclipse yet, you can do it by executing the following command. ("eclipse.workspace" parameter should be the location of the Eclipse workspace. Mine is "D:\Workspaces\Lab".)
D:\Projects\maven-webapp>mvn eclipse:add-maven-repo -Declipse.workspace=D:\Workspaces\Lab
We are almost done. Now, to import the project into Eclipse select "File->Import->Existing Projects into Workspace".
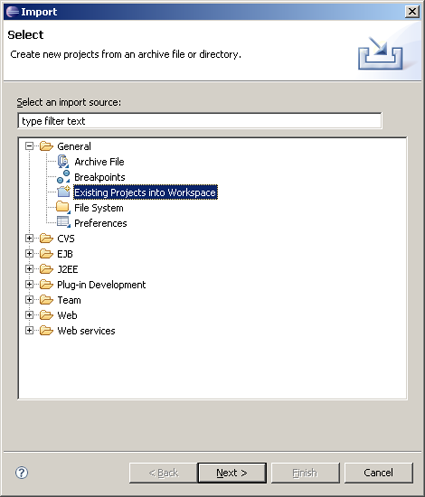
Click "Next >" to get the "Import Projects" dialog box.

Select the radio button with the label "Select root directory". Then, click on the "Browse" button and navigate to the folder that you have created. Mine is "D:\Projects\maven-webapp". Finally, click on the "Finish" button.
Well, that's it! You have a brand new Web application created with Maven. For those who are saying "Thank you!" I reply "Not a big deal".
No comments:
Post a Comment